
Menu
Assign a 'primary' menu
I’ve seen studies showing that spent mushroom substrate can be used as feed supplement for chickens and cattle but this was when the substrate was straw. I’ve tried offering some spent coffee substrate to pigs and they didn’t seem too impressed! My thoughts are that the coffee wouldn’t be very appetising to them and may make them ill.
Hi Jonathan,
depending on the strain, you can usually delay fruiting for a few weeks by either putting your growbags in the fridge, or by covering up the filter patch/air exchange and then putting them in a cool dark place.
Hope it works – worse case scenarios, like you said, is some happy friends 😉
Best wishes, Adam
Jonathan asked:
——————-
I got a bit carried away and have inoculated 6 bag at the same time. They are getting towards fruiting time which means I’m going to have lots of mushrooms. Is there any way of delaying the fruiting so that I doing get them all at the same time or am I going to have very grateful friends as I give some of the mushrooms away.
——————
Hi Michael, it depends what bags you are using – if they are proper mushroom cultivation bags with a filter patch you don’t need to cut any holes until you are ready to fruit the mushrooms.
If your bags don’t have filters then check out the reply I just left (13th June 2016) to another forum post about how you can help create good air exchange here: https://growmushroomsoncoffee.com/topic/how-full-do-you-fill-the-bags/#post-1446
Yes – when you are ready to fruit the mushrooms, you cut the holes (or just one hole if it’s a small bag) right over the top of where the mycelium is.
Yes, you would need to have some form of air exchange..although you could prick a number of tiny holes around the bag it would be better to make your own filter patches to put on your bags instead as it will reduce the likelihood of contamination through the holes.
You can do this by sourcing some Tyvek material and then cutting it into small squares and sticking it over holes you cut in the top half of your grow bags, similar to how these bags sold on ebay in the US have been made:
http://www.ebay.com/itm/Brown-Rice-Flour-Vermiculite-Mushroom-Substrate-Bag-with-Tyvek-Filter-12-bags-/271152102626
The Tyvek is a breathable membrane which will also keep out contamination and is normally sourced fairly easily as it is used in lots of applications..Tyvek overalls, Tyvek Envelopes, or Tyvek sheets for roofing
Hi Judith,
Great question! We had a sample of coffee substrate analysed a while back and it proved to be high in high Potassium, Phosphorus, Calcium and Nitrogen. It also had low levels of heavy metals (good to know!). The high calcium and nitrogen are a bonus as these are often added as supplements when growing on straw.
The only problem that coffee has versus straw is the density and particle size being too fine, which is why the addition of 10-20% straw helps to create a nutrient-rich substrate, which also has good structure for the mycelium to prosper.
Best wishes, Adam
Judith asked:
—————–
Hi,
Two questions arose when I viewed Module 2: one had been asked and answered previously on the forum. The second one is in follow up to the narrator’s remark that commercial growers in the Netherlands only use straw high in calcium. I’m assuming that means each type of substrate has it’s own set of nutrients in varying quantities; that being the case, do you know what coffee grounds bring to the table? Thanks very much, J.
——————
Hi Piers,
Yes it would be worth breaking up and crumbling the coffee/straw mix before mixing if you’re going to make briquettes.
Because of the amount of substrate we deal with at our farm (and the fact we’re in a city centre building where we don’t have space to do much else with it), all our spent substrate goes to a composting operation run by the city centre waste collection service.
It’s a great resource left over at the end of the growing process – let us know how you get on making briquettes 🙂
best wishes, Adam
Hi Václav,
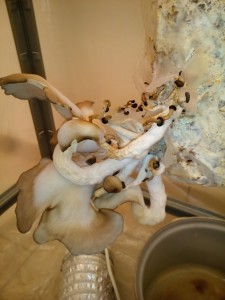
Nice to see your photo and I’m sure it’s the first of many successful crops to come!
It looks like it’s just some of the smaller pins that have dried out – probably after aborting (this means they stop growing part of the way during the growing process).
It’s quite normal for some of the small pins to stop growing, enabling others to grow bigger. I think you have the right conditions of humidity and temperature – the long stems and some of the aborted dried out mushrooms may have been caused by CO2 levels being too high at the start of fruiting (something we discussed in a Facebook message), but it looks like you have sorted this out as the caps spread out and grew properly in the end.
I suspect that the next bag(s) you put in that growing space will grow perfectly 😉
Vaclav posted:
———————-
Hey guys,
First I would like to thanks to Anthony Campbell and his farm set up, which encouraged me to start work harder and set up my own. With baby steps I managed to get first success finally, that I would like to share with you.
Unfortunately some of them dryed out, which is strange. Humidity is all the time between 85-93% and temperatures 13-14. Only once in three days, temperature is around 20, when I put hot water into the chamber to enhance falling humidity. Any ideas?
———————-
Hi Karla,
I’m so sorry – I have just seen your comment here all these months later – it seems we weren’t receiving forum notifications properly back in August/September last year.
Not sure if you’ve had a go at producing some cardboard spawn and found your way in the meantime, but here’s the answer to your questions in case:
1) it is cardboard, the type you get from cardboard boxes (apologies I think card may have two different meanings outside the UK)
2) to pasteurise the cardboard, you just use hot water, poured onto the card and left for 5 minutes, before carefully draining it and squeezing out any excess water.
3) after mixing them together, leave them in the warm for a couple of weeks until fully colonised
Hope this helps – it’s a great way of producing a bit of your own spawn from mushrooms you’ve just grown!
Hi Maureen,
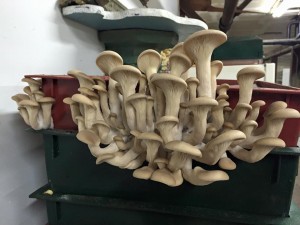
thanks for your story and the photo (which I saw on your Facebook page and then copied in here).
What a beautiful crop! They certainly look happy there in the basement living alongside your worms 🙂
I’m constantly amazed at how resilient mycelium can be…you think it’s dead and then leave it for a while…to be pleasantly suprised a week later with a crop like this.
Hope you got to eat them and looks like you’ll have another crop or two come later from those trays. Do keep us updated of any future grows as well.
Best wishes,
Adam
Maureen posted:
——————–
<!–more–>
I started growing pearl oyster mushrooms with a few suggestions from books I’d read. I started with fresh spawn and coffee grounds in glass jars. I was trying to do this in my apartment but I found once the jar had colonized I could get the mushrooms to grow because the air is too dry in my flat.
I decided it was a failure and took the whole thing to the worm bins in my basement. I read that worms really like mycelium and thought it would be a nice treat for them.
a week later I walked by the worm bins and there was a huge hand sized oyster mushroom growing out the side of the worm bin. Since then I’ve just fed the mycelium from the top and pulled the spent coffee ground out from the bottom.
I will attempt to post a photo of this here.
You can see these at my Facebook page…..
This is Odd an Urban Aquaponic Farm..
Hi John,
Yes it can definitely help to have a better controlled environment for fruiting in…we realise this is something in the current course material which is slightly lacking, so are soon to update it with an instructional on how to make something like this:
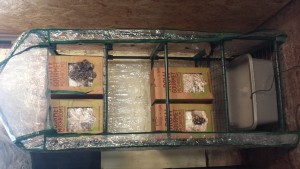
It’s just a 3 tier greenhouse with 6 x 3cm holes cut on each side of the plastic, and a mini pond fogger placed in a tub of water in the bottom. When the front is zipped down it creates the ideal balance of air exchange and humidity and can be left alone for a few days at a time without care.
You could create something on a smaller scale like what you already have in your plastic storage boxes, by just drilling some air holes in the side and then putting some wet perlite on the bottom of the container for the humidity.
Hope this helps.
Best wishes,
Adam